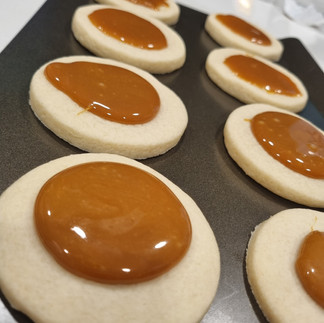
Twix Cookies
- charleymancini
- Feb 22, 2024
- 2 min read
The perfect homemade take on the Twix bar!
Who doesn't love a Twix?! They have the perfect amount of everything all deliciously combined into one! I feel like whatever you're in the mood for when you get a sweet-tooth craving, Twix has us covered!
One of my biggest ideas for this blog was to try and recreate store bought items, completely from scratch! Not only to save money, but to really know what is going into our bodies. I can tell you know, look at the ingredients on a normal Twix bar, compared to the small list below…huge difference right!!
So when my pinterest scrolling set it, and i came across a picture of these cookies, i knew i had to try them out! I’ll be honest, I didn't have high hopes for them because they looked pretty plain compared to the normal Twix bar I'm used to. Yet again, I was pleasantly surprised at these bad boys! (It's been around 5 months since I made them, and my husband asks me every time i bake, if I'm making Twix cookies again! Bless him, haha!)
They keep super well too, which is always such a big win for me and my homemade stuff! So easy and insanely quick to make too! I'm actually getting a craving for them as I type this out…
Hope you enjoy them as much as we do! <3
From my kitchen to yours xoxo
Ingredients:
- 1/2 cup butter
- 1/2 cup granulated sugar
- 1 tsp vanilla extract
- 1 egg white
- 1 1/2 cups flour
- 1 tsp baking powder
- 15ish caramels, unwrapped ( I personally prefer Werthers original)
- 1 tbsp milk
- 2 cups milk chocolate chips

Instructions:
Preheat the oven to 350 F..
In a large bowl, cream together the butter and sugar. Then add in the egg and vanilla, and mix until well combined.
Next, add in the flour and baking powder and mix until completely mixed in.
Roll out the dough on a lightly floured surface. You’ll want the dough to be about ¼ to ½ inch thick, then use a round cookie cutter to cut out the circles.
Cook for 6-9 minutes. (they will rise slightly and no longer be glossy). Leave on a rack to cool.
Now we want to melt the caramels. Place in a small bowl and microwave at 30 sec intervals, making sure not to over-melt/burn them. Stir together until creamy.
Once the cookies have cooled, spoon a few teaspoons of the caramel on top, and let it spread until it almost covers the whole circle. Then place in the fridge for 10 or so minutes until completely cold and caramel has set.
Chocolate time! Melt the chocolate in the microwave in small intervals, stirring to make sure it doesn't burn.
Plop the chocolate on top of the caramel layer and leave to set, before serving.


Comments